When to use
- Wrap API calls that may fail due to external system issues
- Handle record-not-found scenarios without workflow failure
- Implement fallback logic when primary operations fail
- Log errors and continue processing remaining items
- Provide meaningful error responses instead of generic failures
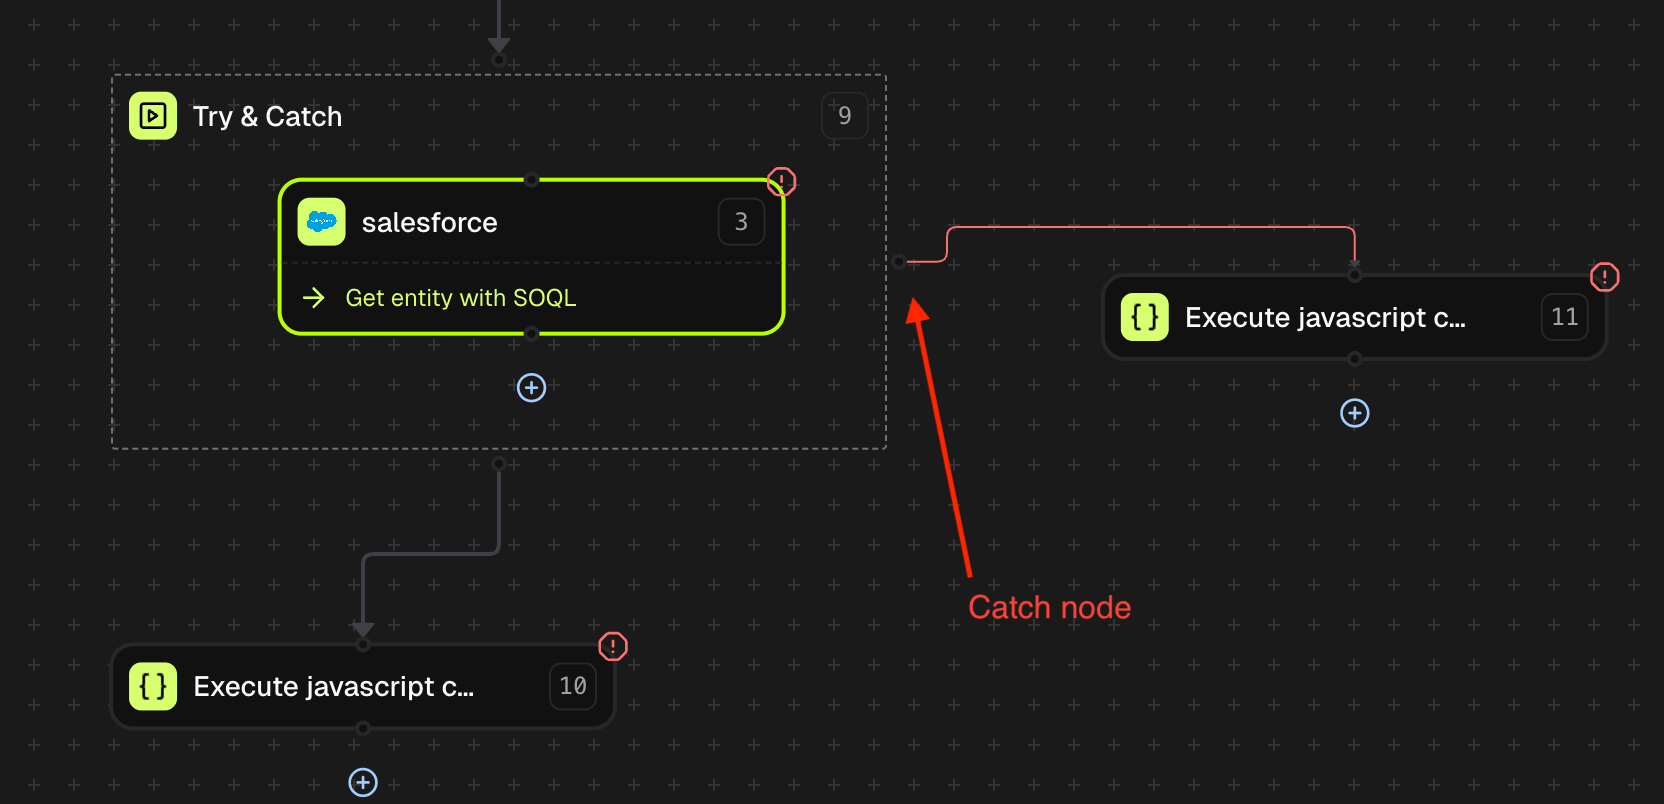
The Try & Catch node is a container node similar to the Loop node. Place the nodes you want to protect inside the container. The catch branch extends from the right side of the container.
Node structure
The Try & Catch node has three connection points:| Connection | Location | Purpose |
|---|---|---|
| Try Block | Inside container | Nodes to execute and monitor for errors |
| Catch Branch | Right side (red line) | Error handling path when try block fails |
| Success Path | Bottom | Normal continuation when try block succeeds |
Execution behavior
| Scenario | Behavior |
|---|---|
| Try block succeeds | Workflow continues via bottom branch (success path) |
| Try block fails, catch succeeds | Workflow continues via bottom branch after catch completes |
| Try block fails, catch fails | Entire workflow execution fails with error status |
| Multiple nodes in try block | First failure triggers catch branch; remaining try nodes are skipped |
Output
The Try & Catch node outputs execution status and error details when applicable. When try block succeeds:| Field | Type | Description |
|---|---|---|
try_catch_result | boolean | true if execution completed (try or catch succeeded), false during catch execution |
message | string | Status message describing execution outcome |
failed_node_id | string | ID of the node that failed in the try block (only present when catch executes) |
error_message | object | Error details from the failed node including message and error array |
Adding to your workflow
Add Try & Catch node
In the workflow editor, click Add Node and select Try & Catch from the utility nodes section. The node appears as a container with a dashed border.
Add nodes to try block
Drag nodes inside the Try & Catch container. These nodes execute in sequence and are monitored for errors. Place nodes that might fail (API calls, data lookups) inside.
Configure catch branch
Connect a node to the right side of the Try & Catch container (red connection line). This branch executes only when a node in the try block fails.
Connect success path
Connect the bottom of the Try & Catch container to the next node in your workflow. This path executes when either the try block succeeds or the catch branch completes successfully.
Settings
The Try & Catch node includes standard node settings available in the Settings tab:Conditions
Conditions
Specify the Node Rule Conditions under which the Try & Catch node should execute. Use AND/OR logic to combine multiple conditions.
Allow Partial Success
Allow Partial Success
Yes or No. When enabled, the node can complete with a partial success status instead of failing outright.Skip Node On Error
Skip Node On Error
Yes or No. When enabled, the node is skipped if it encounters an error, and the workflow continues without executing the try block.Retry Policy
Retry Policy
Configure automatic retry behavior for the Try & Catch node itself.
| Setting | Description |
|---|---|
| Retry Strategy | Fixed (constant delay) or Exponential (increasing delay) |
| Delay (ms) | Time between retry attempts in milliseconds |
| Max Attempts | Maximum number of retry attempts |
Examples
Salesforce Record Lookup with Fallback
Salesforce Record Lookup with Fallback
Handle record-not-found errors when fetching Salesforce data by creating a default record.Workflow Structure:Use Case: Workflow continues with default data when contact not found, preventing failure for downstream processing.
- Start Node - Receives contact ID
- Try & Catch Node - Contains Salesforce lookup
- Try Block: Salesforce “Get Contact by ID”
- Catch Branch: Custom Code to create default contact object
- Continue Processing - Uses contact data (from try or catch)
NetSuite API with Error Logging
NetSuite API with Error Logging
Log API errors to a table for monitoring while allowing workflow to continue.Workflow Structure:
Use Case: Errors are logged for analysis while workflow provides graceful response instead of failing.
- Start Node - Receives vendor data
- Try & Catch Node - Contains NetSuite API call
- Try Block: NetSuite “Create Vendor”
- Catch Branch: Tables Node to log error + Email Node to notify ops
- Response Node - Returns result
| Field | Value |
|---|---|
| Action | Add Table Record |
| Table | error_logs (persistent) |
| vendor_id | {{start.body.vendor_id}} |
| error_code | {{try_catch_node.body.error_message.error[0].errorCode}} |
| error_message | {{try_catch_node.body.error_message.message}} |
| timestamp | {{instance_meta_data.instance_created_time}} |
Tipalti Payment with Retry and Fallback
Tipalti Payment with Retry and Fallback
Attempt payment submission with automatic retry, falling back to queue for manual processing.Workflow Structure:
Catch Branch - Tables Node Configuration:
Use Case: Payment attempts retry automatically. After all retries fail, payment is queued for manual processing instead of being lost.
- Start Node - Receives payment request
- Try & Catch Node (with Retry Strategy enabled)
- Try Block: Tipalti “Submit Payment”
- Catch Branch: Tables Node to add to manual processing queue
- Response Node - Returns submission status
| Setting | Value |
|---|---|
| Retry Strategy | Enabled |
| Policy | Exponential |
| Delay | 1000 ms |
| Attempts | 3 |
| Field | Value |
|---|---|
| Action | Add Table Record |
| Table | payment_queue (persistent) |
| payment_id | {{start.body.payment_id}} |
| vendor_id | {{start.body.vendor_id}} |
| amount | {{start.body.amount}} |
| failure_reason | {{try_catch_node.body.error_message.message}} |
| status | pending_manual_review |
SAP Integration with Multiple Fallback Steps
SAP Integration with Multiple Fallback Steps
Complex error handling with logging, notification, and alternative processing.Workflow Structure:Catch Branch - Email Node:
Use Case: Comprehensive error handling ensures visibility into failures while maintaining workflow completion.
- Start Node - Receives invoice data
- Try & Catch Node
- Try Block: SAP “Create Invoice”
- Catch Branch:
- Log Node (record error)
- Email Node (notify finance team)
- Tables Node (queue for retry)
- Rule Node - Check if invoice was created
- Response Node - Return appropriate status
| Field | Value |
|---|---|
| To | finance-ops@company.com |
| Subject | SAP Invoice Creation Failed - {{start.body.invoice_id}} |
| Body | Invoice creation failed and has been queued for manual review. Error: {{try_catch_node.body.error_message.message}} |
Accessing error details
When the catch branch executes, error information from the failed node is available via templating:| Data | Template Syntax |
|---|---|
| Error message | {{try_catch_node.body.error_message.message}} |
| Error code | {{try_catch_node.body.error_message.error[0].errorCode}} |
| Error description | {{try_catch_node.body.error_message.error[0].message}} |
| Failed node ID | {{try_catch_node.body.failed_node_id}} |
| Try-catch result | {{try_catch_node.body.try_catch_result}} |
Troubleshooting
Catch Branch Not Executing
Catch Branch Not Executing
| Problem | Solution |
|---|---|
| Error not caught | Verify the failing node is inside the Try & Catch container, not connected externally |
| Catch branch not connected | Ensure the catch branch is connected to the right side of the container (red line) |
| Skip Node On Error enabled | Set “Skip Node On Error” to No in Settings if you want error handling to execute |
Workflow Still Failing
Workflow Still Failing
| Problem | Solution |
|---|---|
| Catch branch also fails | Add error handling within the catch branch itself, or use a simpler fallback operation |
| Error in catch node | Review catch branch node configuration. Use Log node to debug before complex operations. |
| Missing error details | Ensure you’re using correct templating syntax to access error_message object |
Error Details Not Available
Error Details Not Available
| Problem | Solution |
|---|---|
| error_message is null | Some failures may not provide detailed error info. Check the failed node’s logs directly. |
| Wrong template path | Use {{try_catch_node.body.error_message.message}} not {{try_catch_node.error_message}} |
| Accessing wrong node | Verify you’re referencing the Try & Catch node, not the failed node inside it |
Success Path Not Executing
Success Path Not Executing
| Problem | Solution |
|---|---|
| Bottom branch not running | Verify connection from bottom of Try & Catch container to next node |
| Catch branch blocks continuation | Ensure catch branch completes successfully. Add error handling in catch if needed. |
| Conditions blocking execution | Check Settings > Conditions if configured |
Best practices
- Keep catch branches simple: Use reliable operations (logging, tables) that are unlikely to fail
- Always log errors: Even if you handle them gracefully, log error details for debugging
- Use meaningful fallbacks: Provide default values or alternative processing instead of just suppressing errors
- Don’t nest Try & Catch excessively: One level of error handling is usually sufficient
- Test both paths: Verify workflow behavior when try succeeds and when it fails
Next steps
Terminate node
End workflows with a specific error status.
Log node
Record error details for debugging.
Tables node
Queue failed items for retry.
Loop node
Process items with individual error handling.