> ## Documentation Index
> Fetch the complete documentation index at: https://cobalt-55-abhishek.mintlify.site/llms.txt
> Use this file to discover all available pages before exploring further.
# Write data to Third-party Apps
> In this, you'll get to know how you can send data from your app to other apps.
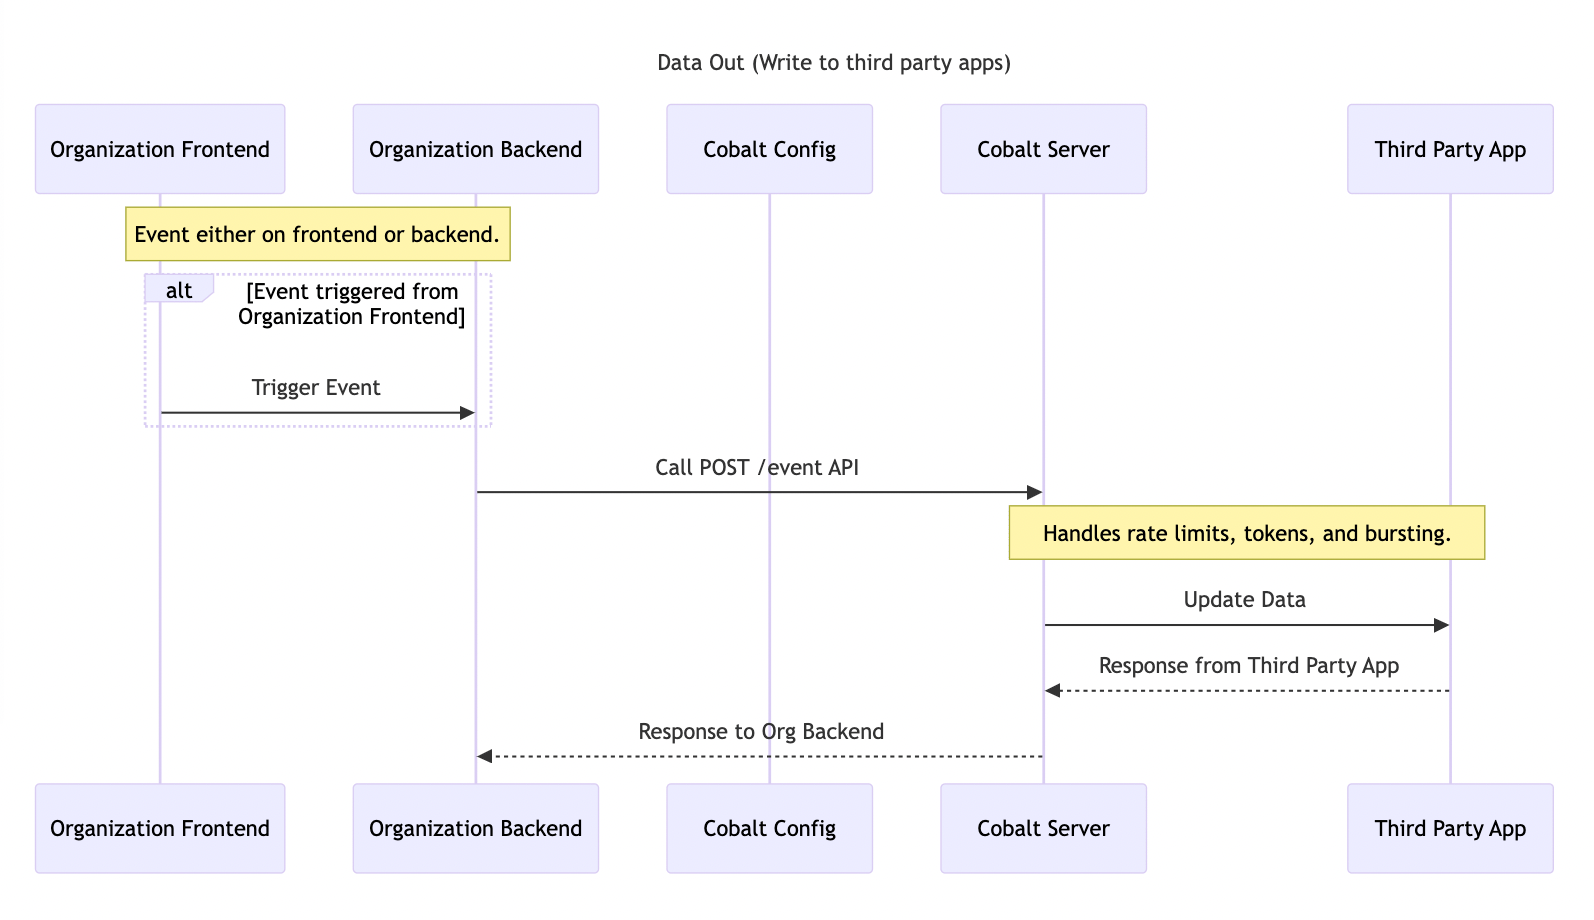 You can send data from your apps to other apps by using Cobalt **Events**.
An event model contains name of the event and the trigger payload. The trigger payload contains sample data schema that can be used as data variables and are used inside a workflow as placeholders while defining the workflow.
To learn more about Cobalt Events, you can refer to our guide [here](/legacy/guides-v1v2/developer-settings/events).
## Create Event
Follow these steps to create an Event in Cobalt:
1. **Create Event** : Navigate to `Developer` in Cobalt > `Events` > Click on `New Event` > Select a `Model` > Update the sample Payload to your requirements > Click on `Create Event`.
You can send data from your apps to other apps by using Cobalt **Events**.
An event model contains name of the event and the trigger payload. The trigger payload contains sample data schema that can be used as data variables and are used inside a workflow as placeholders while defining the workflow.
To learn more about Cobalt Events, you can refer to our guide [here](/legacy/guides-v1v2/developer-settings/events).
## Create Event
Follow these steps to create an Event in Cobalt:
1. **Create Event** : Navigate to `Developer` in Cobalt > `Events` > Click on `New Event` > Select a `Model` > Update the sample Payload to your requirements > Click on `Create Event`.
 It is expected that you pass on the data as the Sample Payload while you are triggering this event. This is because, the properties defined in the sample payload can be used as trigger variables inside a workflow.
## Trigger an Event
You can trigger an event that was created in Cobalt by using the [Trigger Event API](/legacy/api-reference/events/trigger-event-by-slug).
1. **Request** : Make a POST request to the `/event/:slug` endpoint. `linked_account_id` is a mandatory field to be passed while making the request.
```JavaScript Request theme={null}
curl --request POST \
--url https://app.refold.ai/api/v2/public/event/:slug \
--header 'Content-Type: application/json' \
--header 'linked_account_id: ' \
--header 'x-api-key: ' \
--data '{
"event": "",
"payload": {
"first_name": "Mark",
"last_name": "wood",
"employee_id": 221,
"is_new": false,
"address":{
"house_no":"221",
"street": "lorem ipsum",
"pincode":560103
}
}'
```
| Param | Required | Type | Description |
| ------------------- | --------- | ------ | ------------------------------------------------------- |
| linked\_account\_id | Mandatory | String | Unique customer identifier |
| event | Mandatory | String | Name of the event |
| payload | Optional | Object | Event payload with user data required for the workflow. |
2. **Response** : On a successful request, you will get a message that the event was triggered successfully.
```JavaScript 200 theme={null}
{
"message": "Webhook Fired Success"
}
```
3. **Handle Errors** : If the `/event/:slug` endpoint returns a 400 error, your server-side code should handle it gracefully. The error is returned if you provided the wrong name of the event.
```JavaScript 400 theme={null}
{
"status_code": 400,
"error_type": "BAD_REQUEST",
"message": "Trigger with name Wrong_Event not found for application 646370324e3b114f9c720719",
"request_id": "fa6ad809-3a6d-4c3d-9b86-c2c0662f3f37"
}
```
## Checkpoint
You have now created an event in Cobalt and can send data from your app to other third party apps or integrations enabled in Cobalt.
It is expected that you pass on the data as the Sample Payload while you are triggering this event. This is because, the properties defined in the sample payload can be used as trigger variables inside a workflow.
## Trigger an Event
You can trigger an event that was created in Cobalt by using the [Trigger Event API](/legacy/api-reference/events/trigger-event-by-slug).
1. **Request** : Make a POST request to the `/event/:slug` endpoint. `linked_account_id` is a mandatory field to be passed while making the request.
```JavaScript Request theme={null}
curl --request POST \
--url https://app.refold.ai/api/v2/public/event/:slug \
--header 'Content-Type: application/json' \
--header 'linked_account_id: ' \
--header 'x-api-key: ' \
--data '{
"event": "",
"payload": {
"first_name": "Mark",
"last_name": "wood",
"employee_id": 221,
"is_new": false,
"address":{
"house_no":"221",
"street": "lorem ipsum",
"pincode":560103
}
}'
```
| Param | Required | Type | Description |
| ------------------- | --------- | ------ | ------------------------------------------------------- |
| linked\_account\_id | Mandatory | String | Unique customer identifier |
| event | Mandatory | String | Name of the event |
| payload | Optional | Object | Event payload with user data required for the workflow. |
2. **Response** : On a successful request, you will get a message that the event was triggered successfully.
```JavaScript 200 theme={null}
{
"message": "Webhook Fired Success"
}
```
3. **Handle Errors** : If the `/event/:slug` endpoint returns a 400 error, your server-side code should handle it gracefully. The error is returned if you provided the wrong name of the event.
```JavaScript 400 theme={null}
{
"status_code": 400,
"error_type": "BAD_REQUEST",
"message": "Trigger with name Wrong_Event not found for application 646370324e3b114f9c720719",
"request_id": "fa6ad809-3a6d-4c3d-9b86-c2c0662f3f37"
}
```
## Checkpoint
You have now created an event in Cobalt and can send data from your app to other third party apps or integrations enabled in Cobalt.